Concept and Workflow
Note
Abstract
The following sections describe the concept and general workflow of building appliances with KIWI NG 10.3.9.
Overview
KIWI NG builds so-called system images (a fully installed and optionally configured system in a single file) of a Linux distribution in two steps (for further details, see Image Building Process):
Prepare operation: generate an unpacked image tree of your image. The unpacked tree is a directory containing the future filesystem of your image, generated from your image description.
Create operation: the unpacked tree generated in step 1 is packaged into the format required for the final usage (e.g., a
qcow2disk image to launch the image with QEMU).
KIWI NG executes these steps using the following components, which it expects to find in the description directory:
- Image Description:
The
config.xmlfile contains the image description, which is a collection of general settings of the final image, like the image layout, installed packages, present users, etc.Note
The filename
config.xmlis not mandatory; the image description file can also have an arbitrary name plus the*.kiwiextension. KIWI NG first looks for aconfig.xmlfile. If it cannot be found, it picks the first*.kiwifile. When using a file with the.kiwiextension, multiple markup options are supported, includingXML,YAML, andTOML.- User-Defined Scripts:
If present, custom configuration shell scripts run at different stages of the build process. They can be used to fine-tune the image in ways that are not possible via the settings provided in
config.xml.- Overlay tree directory:
The overlay tree is a folder (called
root) or a tarball (calledroot.tar.gz) that contains files and directories that will be copied into the unpacked image tree during the Prepare operation. The copying is executed after all the packages included inconfig.xmlhave been installed. Any files that are already present will be overwritten.- CD root user data:
For live ISO images and install ISO images, an optional archive is supported. This is a tar archive matching the name
config-cdroot.tar[.compression_postfix].If present, the archive will be unpacked as user data on the ISO image. For example, this is used to add license files or user documentation. The documentation can then be read directly from the CD/DVD without booting from the media.
Image Building Process
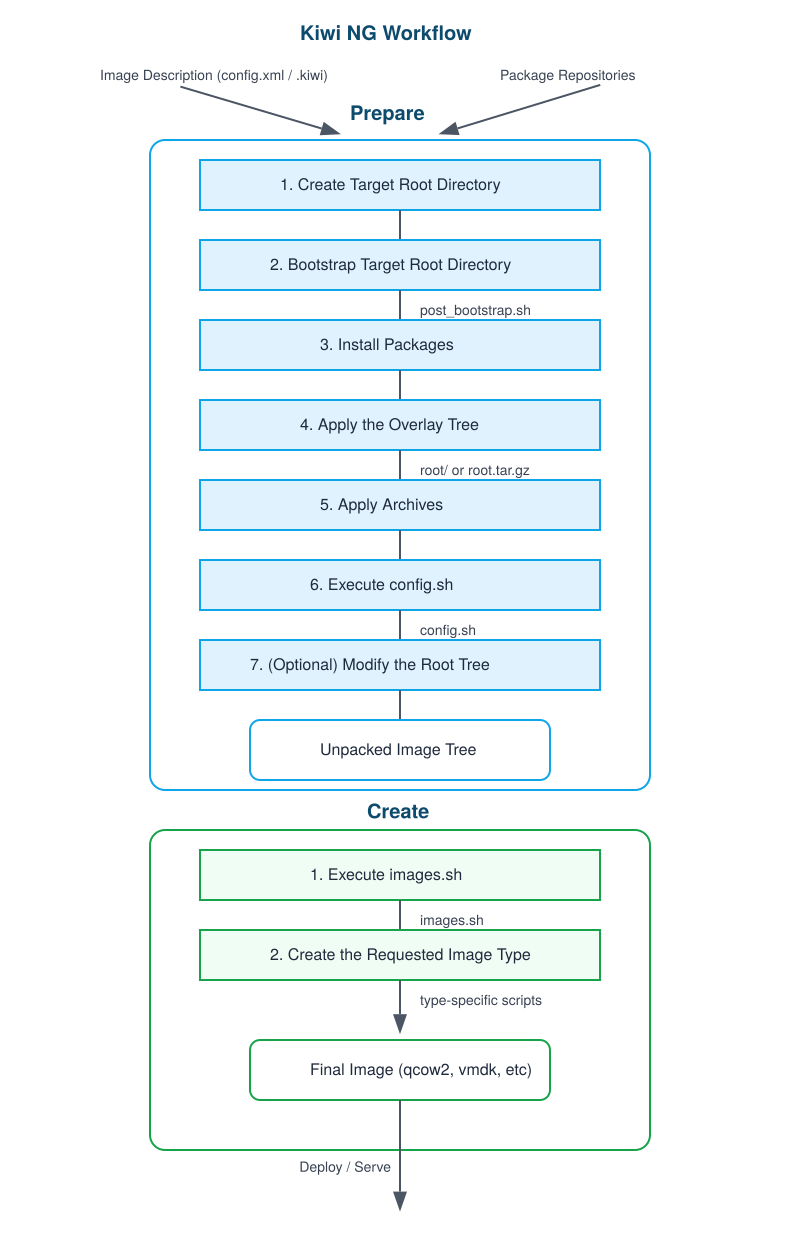
Kiwi NG Build Process Flow Diagram
KIWI NG creates images in a two-step process: The first step, the prepare
operation, generates a so-called unpacked image tree (directory) using
the information provided in the config.xml configuration file
(see Image Description).
The second step, the create operation, creates the packed image or
image in the specified format based on the unpacked image tree and the
information provided in the config.xml configuration file.
The Prepare Step
As the first step, KIWI NG creates an unpackaged image tree, also called a “root tree”. This directory will be the installation target for software packages to be installed during the image creation process.
For the package installation, KIWI NG relies on the package manager specified
in the packagemanager element in config.xml. KIWI NG supports the
following package managers: dnf, zypper (default), and apt.
The prepare step consists of the following substeps:
Create Target Root Directory
By default, KIWI NG aborts with an error if the target root tree already exists to avoid accidental deletion of an existing unpacked image. The option
--allow-existing-rootcan be used to work based on an existing root tree.Bootstrap Target Root Directory
First, KIWI NG configures the package manager to use the repositories specified in the configuration file, via the command line, or both. After the repository setup, the packages specified in the
bootstrapsection of the image description are installed in a temporary directory external to the target root tree. This establishes the initial environment to support the completion of the process in a chroot setting. At the end of thebootstrapphase, the scriptpost_bootstrap.shis executed, if present.Note
The essential bootstrap packages are usually
filesystemandglibc-localeto specify as part of the bootstrap. The dependency chain of these two packages is usually sufficient to populate the bootstrap environment with all required software to support the installation of packages into the new root tree.Install Packages
After the
bootstrapphase, all other<packages>sections are used to complete the installation as a chroot operation. KIWI NG uses the package manager as installed in thebootstrapphase and installs all other packages as configured.Note
The installation of software packages through the selected package manager may install unwanted packages. Removing these packages can be accomplished by marking them for deletion in the image description; see Uninstall System Packages.
Apply the Overlay Tree
Next, KIWI NG applies all files and directories present in the overlay directory named
rootor in the compressed overlay,root.tar.gz, to the target root tree. Files already present in the target root directory are overwritten. This allows you to overwrite any file that was installed by one of the packages during the installation phase.Apply Archives
All archives specified in the
archiveelement of theconfig.xmlfile are applied in the specified order (top to bottom) after the overlay tree copy operation is complete (see The archive element). Files and directories are extracted relative to the top level of the new root tree. As with the overlay tree, it is possible to overwrite files already existing in the target root tree.Execute the user-defined script
config.sh.At the end of the preparation stage, the script
config.shis executed (if present). It is run in the top-level directory of the target root tree. The script’s primary function is to complete the system configuration. For more details about custom scripts, see User-Defined Scripts.Modify the Root Tree
The unpacked image tree is now finished and can be converted into the final image in the create step. It is possible to make manual modifications to the unpacked tree before it is converted into the final image.
Since the unpacked image tree is just a directory, it can be modified using the standard tools. Optionally, it is also possible to ‘change root (
chroot)’ into it, for instance, to invoke the package manager. Besides the standard filesystem layout, the unpacked image tree contains an additional directory named/imagethat is not present in a regular system. It contains information KIWI NG requires during the create step, including a copy of theconfig.xmlfile.By default, KIWI NG will not stop after the prepare step and will proceed directly with the create step. Therefore, to perform manual modifications, proceed as follows:
$ kiwi-ng system prepare $ARGS
$ # make your changes
$ kiwi-ng system create $ARGS
Warning
Modifications of the unpacked root tree
When performing manual modifications of the unpacked image tree, be aware that these changes might be lost when calling the prepare step again. Therefore, avoid making changes that should be persistent across multiple runs of the
preparestep. The recommended way to apply persistent changes to the unpacked image directory is to change the original image description and re-run thepreparestep.
The Create Step
KIWI NG creates the final image during the create step: it converts the unpacked root tree into one or multiple output files appropriate for the respective build type.
It is possible to create multiple images from the same unpacked
root tree, for example, a self-installing OEM
image and a virtual machine image from the same image description. The only
prerequisite is that both image types are specified in config.xml.
During the create step, the following operations are performed by KIWI NG:
Execute the User-defined Script
images.sh.At the beginning of the image creation process, the script named
images.shis executed (if present). For more details about custom scripts, see User-Defined Scripts.Create the Requested Image Type
KIWI NG converts the unpacked root into an output format appropriate for the requested build type. During this process further image type specific user defined scripts may be executed (see User-Defined Scripts).